Monday, 21 November 2016

A TITANIC DAY

I don't know if Murphy's Law - "If anything can go wrong, it will" - is international or not but it certainly applies here at the moment.

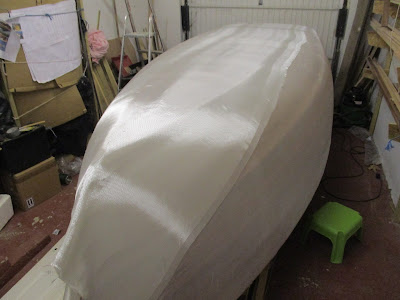
Although Seagull looks fine from a distance:


I'm really unhappy about the way the Epoxy Resin over the sheathing has worked out. I've never used this system before and never seen it done other than on videos. Consequently I have made all the classic mistakes.

   For a start, where sheets of sheathing lapped over each other the whiteness remains after two coats of epoxy. Worse than that are the large bubbles that have occurred near the stem and stern.


I will have to sandpaper these out and recover the area. On the stern I have cut out the bubbles to show what will happen to them if I ignore them: the bubbles will shatter at the first knock.


OK, I'll be able to fix the problems - but it means I will have to paint the outside of the boat to cover the cosmetic consequences of my ineptitude.

The next problem is the weather. We have storms raging, with freezing North Easterly gales. This direction turns my boathouse into a wind-tunnel and freezer.


I braved the conditions but the cold adversely effects the timber making it brittle. For example: the stem which I steam bent (a couple of posts ago) didn't like being being fixed back in position in the cold. There was was a sharp crack! and I turned to find this:


It seemed a good time to get back to portrait painting in a warm studio and wait for the wind to change direction.

Daisy (Great Granddaughter)


Work In Process - 'Brotherly Love'  (Great Grandsons) 

Monday, 14 November 2016

The Emperor's New Clothes

Do you remember Hans Christian Anderson's story of the Emperor's new clothes? For those who don't: The emperor is scammed into buying an invisible set of clothes; the salesman convinces the emperor that only intelligent people can see the clothes. The Emperor parades in the nude whist everyone congratulates him on buying such a wonderful set of clothes.

Seagull, antithetically (my favourite word which means in contrast) starts off with a very visible set of clothes ... which slowly disappear, albeit they are still there. How this happens is rather difficult to explain, but I owe an explanation to my dear friends, Julie the painter/tutor/genius and Lynne the writer/tutor/genius, both were worried (see last post comments) that we would lose the rich colour of the planking.


Because boats are always female, when I dressed Seagull, the analogy  that comes to mind is a wedding dress. 


As you can see, the beauty of the wood seems to be hidden. Before I explain to you the process you're about to witness, let me set the scene.

1. The planks are made from Red Cedar because it is knot-free, has a lovely finish when varnished, and bends easily without splitting. The downside is that it marks easily if bumped - in the way boats do - and water eats it alive. So if I could cover it in something that gives it strength and stops it coming into contact with water then I would... and  that's exactly what I am doing: Woven Fibre Glass Cloth is the material I am using to sheath Seagull both outside and in.

2. Epoxy Resin is basically a glue, which I used earlier in this blog, and it is this that I shall use to stick the wedding dress onto the boat.


I push the yellow handle on tin 105 down and it delivers five portions of the resin into the tub at the front of the photograph. I then push down the handle of the smaller tin marked 205 and it delivers 1 portion of hardener in the tub. I then stir the concoction for 2 minutes until it is fully blended. The mixture has a working life of about 20-30 minutes during which time it gets hotter and hotter ... one can't hang around. I then pour it onto the fibre glass and I use a paint roller and plastic 'scraper' to spread it over the wedding dress.


It isn't as easy a process as it sounds: the cloth wants to move and make wrinkles and 'snags' as easily as ladies tights (so I'm 'er told).


It's surprising how long this takes to do: one side and the transom (back end) took most of the day.


There will be two further coats after this one. Besides being a glue, epoxy and the fibre glass set into a steel like coat that brings both strength and a resistance to surface damage. Finally, the resin sets like a very shiny varnish.

Friday, 11 November 2016

The Icing (Frosting) On The Cake

I'm into completely new territory here - fibre-glass sheathing of the boat.

Some sources say don't administer an epoxy-resin priming coat, because there is a tendency for the fibre-class cloth to snag on it. However, I followed the advice of Selway Fisher, who designed the boat, and primed yesterday, as the last post shows.

The fibre glass cloth is very fragile and awkward to use and yes there was a tendency for it to snag. However, I don't know if it would have been easier without yesterday's application of the primer coat.

Well the sheathing is in place now, and I'm reminded of a Wedding Cake.


You can see why I removed the outer stem now: in order that the 'cloth goes under it - a heck of a job to have gone over it.

I put the sheathing on in three pieces.


.

The cloth is simply lying in place and I don't start epoxy-resin coating it until tomorrow: I need to start early so that I can coat it all in one go.

I keep trying to worry about the outcome of each stage but I refuse to let myself. It's a total new experience this fibre glass cloth and epoxy resin way of building ... so just enjoy the experience and don't expect expert outcomes.

Thursday, 10 November 2016

A Lovely Finish

I should warn you that I only have 5 (corny) jokes in my repertoire. The first one I trot out every time I use varnish or paint:

Did you hear the one about the French Polisher who drank the varnish by mistake?
                    An Awful death ... but ... A Lovely Finish.

Today I removed the outer stem - for reasons I will show you later in the week. I then wiped every inch of the hull with Tak-Rags.


All my life I read about tak rags and could never find them. Now of course, with the Internet, one does a search and has the item in your hands within 24 hours (ish).

For those that don't know, Wikipedia defines them as a specialized type of wiping cloth that is treated with a tacky material. It is designed to remove loose particles of dust, dirt and lint that would contaminate a surface that is to be painted, coated, laminated, photo-etched, or otherwise finished.

I then applied one coat of Epoxy Resin, by roller, to the whole hull as a primer coat.


Next task up will be placing woven fibreglass cloth all over the hull and then Epoxy coating over that!

Wednesday, 9 November 2016

The Build Continues

I finally got to work on the boat again - Alleluia!

This type of boat has an outer stem that is separate to the inner stem - the stem being the very front of the boat. Whilst the inner stem is made from Douglas Fir, the outer is from a hardwood: Utile, which is a timber from Western Africa and used as a substitute for mahogany. 

Here is a photo of the outer stem in place - it's the dark wood.


The problem was how to bend such a large piece of hardwood without the wood snapping? Assuming I was strong enough to carry out that task.

The answer was that I built the outer stem from 5 layers of Utile - shown below - rather than one solid piece.


Even then the risk of snapping the pieces as they were bent through almost 90 degs was high. I therefore resorted to the shipwright's old trick of steaming the wood. This in turn raised the problem of how to steam it. Then I had a eureka moment and took the rain drain pipe and end-bend from my workshop and brought it into the 'boathouse'.

Drain pipe from roof that was removed to become a steamer!

 I also took the kettle from the kitchen whilst Pat was distracted.


I put the wood  for steaming into the drain pipe, the other end I inserted into the kettle and switched it on


I wanted the steam, from the boiling water in the kettle, to stay in the pipe for as long as possible and so I tore the sleeve off my shirt and stuffed it into the far end of the pipe.


After 10 minutes or so I took out the steamed Utile and, as quickly as I could, screwed it into place. It worked really well despite being really hot to handle. 
     This process was repeated for the next four pieces and then left overnight to settle into its new shape.

I was quite pleased with myself, camera blur notwithstanding.